


Jacob's Ladder Craft Project
Jacob's ladder is an ancient folk toy that seems originally to have been drawn from the story of Jacob in the Bible, although the toys have been found in many cultures all over the world.
This toy can also be made from corrugated cardboard instead of wood, glue can be used instead of brads. Children may be more comfortable with these substitute materials but be aware that the toy will not work as well.
WHAT YOU NEED
• 6-8 blocks of 3 1/2-in. x 1¾-in. x 3/8-in. hardwood or plywood
• 10-ft. length of medium-weight binding tape (used for sewing projects)
• 1/2 inch-long headed brads
plus
- Measuring stick or tape
- Fast-drying wood putty
- 180 or 220 grit sandpaper
- Paint and/or varnish
- Small hammer
- Pencil
STEP-BY-STEP INSTRUCTIONS
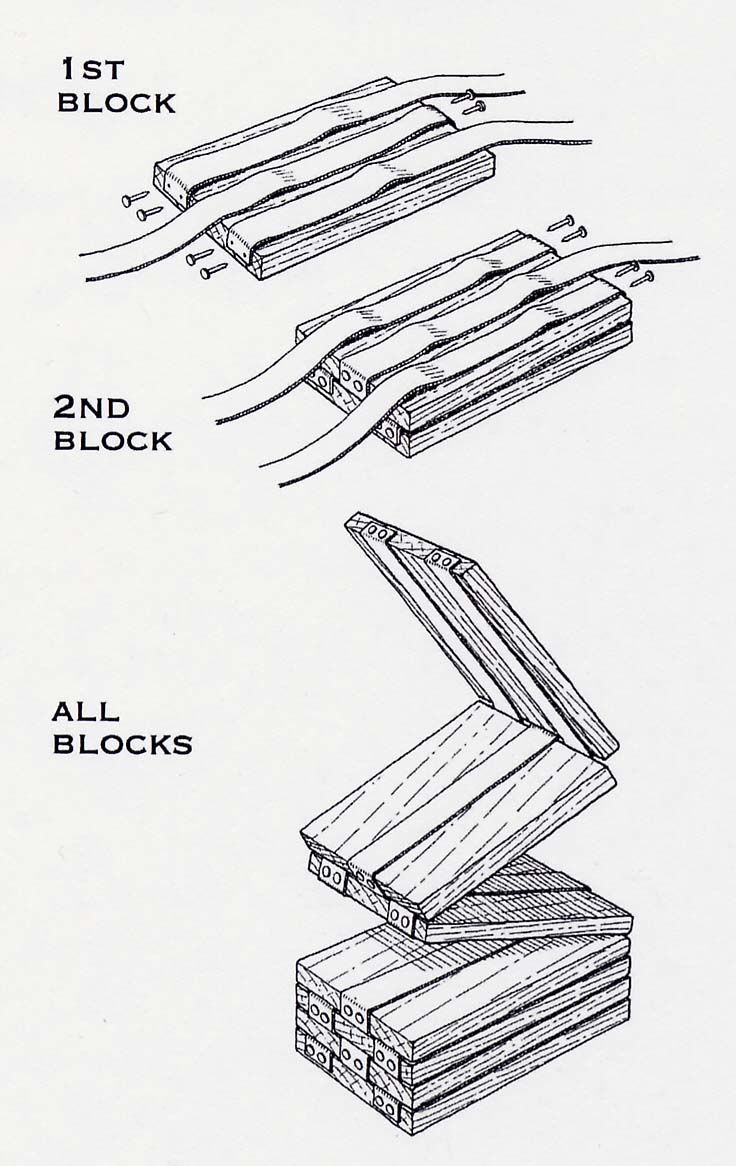 | 1 Cut out six, seven, or eight rectangles measuring 3 1/2 in. by 1 3/4 in. from 3/8-in.-thick hardwood or plywood. The toy should reach the floor when the child holds it; the exact length of the toy should be matched to the height of the child. 2 If you're using plywood, fill any voids in the laminate with fast-drying wood putty, sand well with 180- or 220-grit sandpaper, and paint the blocks contrasting colors. If you're using fine-grained hardwood blocks, leave them unpainted or finish with varnish or oil before attaching the tapes. 3 Stand the blocks on end and, using a sharp pencil, mark a centerline for one tape that will go over, under, over, under all the blocks. Turn the blocks over and draw the same centering line on the opposite end. 4 Place the first block on a table. Attach a length of binding tape to one end of the block with two brads. The tape should be centered over the centerline. Then tack the two side tapes to the opposite end of the first block; set in each side tape 1/16 in. from the block's edges. Lay the tapes across the face of the block so the two side tapes go in the opposite direction to the center tape, as shown in the top drawing at right. 5 Place a second block on top of the first and wrap the tapes around the block (see the second drawing at right). Pull the tapes snug, but not too tight, making sure no tape is twisted. (If the tapes are too tight, the blocks won't flow when you operate the toy.) Tip the block on end and nail each tape with two brads. 6 Continue adding blocks and attaching apes with two brads to the alternating ends of each block until you reach the top of the stack (see the bottom drawing at right). Trim the excess tape from the ends when the last block is in place. If everything is done right, when you look at the ends of the blocks, you should see a pattern of single tape, double tape, single tape, and so on. Since there's no glue to dry, try the toy out right away.
|
HOW TO USE THE TOY To operate the toy, hold the top block by its edges and let the rest of the identical blocks swing downward until the "ladder" is fully open. Then, holding the top block by its edges, turn it 180° in a left rotation, until the top and second blocks are parallel and touching. When the held block hits the hanging block, a series of blocks will begin cascading down. Then repeat the motion 180° to the right. Each time you move the block 180°, a cascade of apparently moving blocks will flip to the bottom. There's a neat trick you can play with your Jacob's ladder: Fold up a dollar bill into a small rectangle and tuck it under one of the tapes. Then operate the toy. The dollar will successively disappear, appear, disappear, and so on, for no apparent reason.
| |
| [Back] | |
